Understanding some basic HTML tags for SEO purposes will be beneficial when you’re adding content to your website. Don’t be scared, HTML doesn’t have to be overwhelming and complicated. There are some simple tags that a beginner can learn. These will go a long way when it comes to optimizing your content for SEO.
What is HTML?
HTML stands for Hypertext Markup Language and it is the code used to build web pages. It is the basic building blocks of any website.
Why do I need to use HTML?
If you’re adding content to a website it will be added using HTML. If you don’t understand HTML, that doesn’t mean you’re out of luck and can’t build a website. If you’re using a content management system, such as WordPress, you can build out website content by filling out pre-built elements. But, to make sure you’re building content in an SEO friendly manner, you still want to have at least a basic understanding of HTML tags and components.
Ensuring your content is formatted in HTML properly will benefit both the readers and search engines. When you add in headings, bullets, bold text, and hyperlinks you are making it easier for the reader to scan the article to identify what it is about. That structure is also having the same impact for search engine spiders.
Formatting your content with the proper HTML tags will make your article make more sense to your readers and search engines. It’s a win-win.
Let’s go over some of the most important, and simplest, HTML tags to include in your content.
HTML Elements You Should Know
Title Tag
Why the Title Tag Matters
You want to make sure each page on your website has a unique title tag. The title tag is one of the elements search engine spiders can use to identify what the page is about. The title tag is also the text that is used to display as the main headline in search results.

Make sure to include your targeted keyword in your title tag. Also, keep it under 60 characters long. That way it doesn’t get truncated in the search results.
What the Title Tag Code Looks Like
The title tag is found in the <head> section of the HTML code. You will find the title wrapped in a <title> tag. Here is an example:
<title>This is an Example Title</title>How to Add a Title Tag in WordPress
To add a title tag in WordPress, all you need to do is insert a title in the page title field on your new post or page.
Now, this does depend on your website theme. It’s possible this has been modified on your theme. To confirm that the page title worked as intended, save your work and view the new page or post. If the title tag updated properly the title will be displayed in the tab at the top of your browser. Or, you can view your source code and search for <title> to confirm it is accurate.
Meta Tags
There are a few important meta tags you should be aware of, specifically the meta description. These tags help communicate details about the page content to search engines.
If you’re using a content management system such as WordPress, you won’t need to know the HTML to implement these tags. You still want to be aware of them so you remember to insert them and optimize them. Here is a full guide on what meta tags are and how to optimize them for SEO.
Header Tags
Why Header Tags Matter
The header tags create the hierarchy of your article. The most important header is called the h1 tag.
There should be only one h1 tag on each page. And, you want to include your targeted keyword in your h1 tag.
The rest of your header tags will be h2, h3, h4, h5, or h6. The higher the number, the less important and lower in the hierarchy the header is.
It’s common for an article to have one h1 tag and every other heading uses an h2 tag. I often will have h3 tags and sometimes even h4 tags if that’s how the article is naturally structured.
It’s uncommon to go all the way to h5 and h6. Normally using bullets or numbered lists at the point is more effective. But, there is no rule against it. Use the level of headings you need for the article to be beneficial to the reader.
What the Code Looks Like for Header Tags
Header tags wrap the header text with the level of heading you want to assign to the text. Here is an example for each header level:
<h1>This is an h1 tag</h1>
<h2>This is an h2 tag</h2>
<h3>This is an h3 tag</h3>
<h4>This is an h4 tag</h4>
<h5>This is an h5 tag</h5>
<h6>This is an h6 tag</h6>
How to Add Header Tags in WordPress
Adding header tags in WordPress is simple, but the process varies depending on which editor you use.
I like to use the code editor. So, to add a header I just surround the header text with the code from the example above.
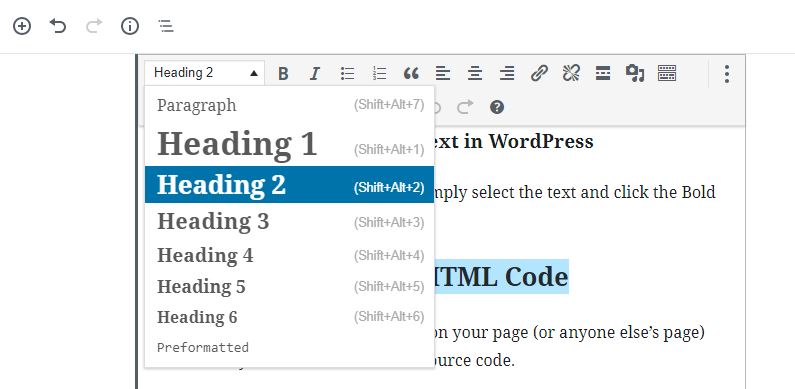
If you use the visual editor (which is the default) you can click the plus icon to Add Block. Then select Heading. You can then insert your heading text and select the level such as h2, h3, or h4.
If you already have entered the text, just select it. You will see an editor appear with a dropdown and can select a new heading level from the dropdown menu.

Image and Alt Tags
Why do Image and Alt Tags Matter?
Images are important because they provide a better experience for the reader. They also are important from an SEO perspective because they can allow your page to rank in image searches.
Alt tags provide a text description of the image. These are important because they provide accessibility for vision impaired visitors to be able to understand what the image is about. They also communicate the relevance and meaning of the image to search engine spiders.
What Does the Code Look Like for Image and Alt Tags?
The alt tag is an attribute of the image tag. Unlike a header tag that has an opening and closing tag, the image tag does not need to be closed. Here is an example:
<img src="image.jpg" alt="example image" />How to Add Image and Alt Tags in WordPress
To add an image to your WordPress page you can go to Media > Add New. Upload your image. In the fields provided, make sure to include a description under Alt Text. Then, just copy the image URL to paste in your article.
If you’re using the visual editor you can also add an image by clicking the plus icon to Add Block. Then select Image and follow the prompts.
Links
Why Links Matter
Including links in your articles will help both readers and search engine spiders. Both readers and search engines will use the links to navigate from one article to another.
What the Code Looks Like for Links
To add a link you use an anchor tag. The anchor tag surrounds the item you want to link. This can be text or an image. When it surrounds text, this text is referred to as anchor text.
Links can vary depending on if they open another webpage, send an email, or jump to a different section of the same webpage.
Here is a link that opens another webpage:
<a href="https://example.com">example website</a>Here is a link that sends an email:
<a href="mailto:test@example.com">email example</a>To add a link that jumps to another part of the same page you need the link as well as an ID on the section you want the link to jump to. You can add in ID to an existing paragraph tag or create a new div tag. Here is a an example:
<a href="#top">Top</a>
<p id="top">This is the top of the page.</p>
How to Add Links in WordPress
In WordPress you can select the text you want to add a link to and click the insert / edit link button.
Lists
Why Lists Matter
Lists make it easier for readers to digest complicated or process oriented content. Lists make it easier for people to scan the article and quickly understand what it’s about.
In HTML, you can create either an ordered list or unordered list. An unordered list would be a bulleted list. An ordered list would be a numbered list.
What the Code Looks Like for Unordered Lists
Here is an example to create an unordered (bulleted) list:
<ul>
<li>Here is a list item.</li>
<li>This is another item on the list.</li>
<li>This is the third and final item.</li>
</ul>
What the Code Looks Like for Ordered Lists
The HTML code for ordered lists is very similar to unordered lists. You still list out the list items (<li> tags) but instead of wrapping it in <ul> tags you use <ol>.
Here is an example:
<ol>
<li>This is the first item in the ordered list.</li>
<li>This is the next item.</li>
<li>And the last one.</li>
</ol>
How to Add Lists in WordPress
To add a list in WordPress you can click the plus icon to Add Block. The select List and follow the prompts.
Or, you can select your text and click the Bulleted List or Numbered List icon in the formatting menu at the top.
Bold and Italics
Why Bold and Italics Matter
Similar to lists, bold and italics help the reader scan the article and quickly understand the key topics. Emphasized text does also help with SEO. It’s good to bold or italicize text with your targeted keyword if it comes across as natural and beneficial to the reader.
What the Code Looks Like for Bold and Italic
You can use <b> to bold text and <i> to italicize text but these tags are antiquated. It’s best to use <strong> for bold and <em> for italics. Using <strong> and <em> does help with SEO.
Here is an example:
This word will be <strong>bold</strong> and this one will be <em>italic</em>.How to Add Bold and Italic Text in WordPress
To bold and italicize in WordPress simply select the text and click the Bold or Italic buttons.
How to Review Your HTML Code
If you ever want to check the HTML on your page (or anyone else’s page) the best way to do it is to check the source code.
To view the HTML source code of any website right click on the page and select View page source. From there you can press ctrl (cmd) + F to search for any specific tags you want to review.
These are just a few of the important HTML tags that can help you optimize your SEO efforts.
Are there any important tags that I left off this list? Share your thoughts in the comments!
Do you want to listen to this article? Here’s the podcast episode:
