Deciding whether to start a blog can feel daunting. It can be hard to feel confident that there are people who want to learn from your journey. But the truth is, we all have a unique perspective shaped by our experiences, knowledge, and passions. If you feel called to explore a topic you care deeply about, then blogging provides an incredibly empowering outlet to potentially change lives – both your own and those in your future community. Here are five reasons why you should become a blogger.
Do you want to watch this article? Here’s the video episode:
Guide Others with Your Experience
Blogging revolves around the act of sharing. Regardless of whether your blog is about a hobby you enjoy or your professional expertise, you are sharing your knowledge. It’s common to experience imposter syndrome and doubt if you have the necessary expertise to create a blog on your chosen subject. The key is realizing that you don’t have to be the world’s foremost expert; you simply need to be a step ahead of someone else. In fact, not having mastered the topic completely can make it easier for people to connect with you, as they’ll feel like they’re on the learning journey with you. Just be transparent about where you are in your journey, and you’ll attract the people who value what you have to say.
When we started blogging about our travel trailer adventures, it began as just a project to document our journey primarily for family. However, as we shared our beginner’s perspective and lessons learned along the way, we quickly attracted a wider audience of fellow RV enthusiasts. Even though we were new to owning a trailer ourselves, people appreciated our relatable experiences and were eager to learn.
We started creating videos to answer common questions from the community on topics like our solar setup, leveling the rig, and our favorite gear. Despite being far from experts, our authentic, first-hand knowledge resonated in a way that professional advice sometimes lacks. To our surprise, that channel has continued rapidly growing and now brings in hundreds of dollars each month through affiliate programs – simply by generously sharing our RV experiences.
Build a Like-Minded Community
Don’t underestimate the power of bringing people together. As Helen Keller once said, “Alone, we can do so little; together, we can do so much.” A community provides support, motivation, and valuable connections with people in similar situations to our own. We can be stronger in a community.
When you create a topical blog focused on a specific subject, you naturally attract a group of people who share that interest. As your audience grows, you’re nurturing a community of like-minded individuals. Your blog will attract and grow a community.
Within this community, people will contribute through comments. As time goes on you’ll notice that others start to assist and answer questions, reducing the burden on you. Building a community of people genuinely interested in helping others is immensely rewarding, and the resulting conversations are a lot of fun.
Generate Income
There are many ways to make money with a blog, such as affiliate marketing and online courses. Generating income is a common goal for many bloggers. You likely won’t be making any money the first 6 months but if you have a monetization plan you can make a few hundred dollars a month within the first two years and have the potential to make thousands of dollars a month if you continue to grow the blog.
Not only is generating income a goal for financial improvement but also as a measure of the impact the blog is having on people’s lives. If people are purchasing from you, it signifies that you’ve created authentic content, built trust, and fostered a community. This is a positive sign, both for your wallet and the influence your website is having.
Improve Your Writing Skills
Even if your blog isn’t immediately profitable, you still benefit personally from the experience. The process of consistently crafting blog content will gradually refine your writing skills. Blogging regularly provides consistent writing practice and your readers will provide feedback to help you hone your communication skills over time. The feedback may not be direct but by monitoring Google Analytics you can see what content is viewed and what content gets ignored. It’s amazing how much your writing abilities can improve through the act of creating content regularly.
Acquire New Knowledge
Another personal benefit of maintaining a blog is the opportunity to acquire new knowledge. After writing a few articles, you’ll find that many topics require research. This process allows you to dive deeper into your blog’s subject matter, which is likely something you’re already passionate about. The research process helps to fill knowledge gaps and encourages continuous learning in your field of interest.
Additionally, as you create your blog, you’ll acquire various skills, especially if this is your first blog. From setting up the blog to publishing articles and engaging with your community, it’s a continuous learning journey. If you decide to repurpose your blog content into podcast episodes or YouTube videos, even more learning opportunities await.
In Summary
Becoming a blogger can have a profoundly positive impact on both your life and the lives of your community members. Your unique story is worth sharing, and there are people out there who need to hear it. By making a difference in someone else’s life, you simultaneously make a difference in your own. So if you’re still debating starting a blog, this is your sign that you should get started today.
Do you want to listen to this article? Here’s the podcast episode:
Did you know multitasking actually reduces productivity? A study done by the American Psychological Association found that multitasking can reduce productivity up to 40%. When you batch tasks together it allows you to focus attention on one type of activity at a time, leading to more efficient work habits. And the increase in efficiency makes it even easier to create consistent content, which is essential for a successful blog. That is why the best way to stay on top of your blog is to batch content creation. We will go over a step-by-step guide on how to batch blog content to boost productivity and efficiency.
Do you want to watch this article? Here’s the video episode:
1. Brainstorm Ideas
Before diving into batching content, you need a pool of ideas. The best approach to generating ideas is by conducting keyword research. This not only provides ideas but also ensures that your content aligns with your target audience. If you’re unsure how to perform keyword research, check out our keyword research guide to get started.
2. Content Calendar
Once you have your content ideas, it’s time to create a plan. And there’s no better way to organize your content efforts than by creating a content calendar. A content calendar is essentially a schedule that dictates when each article will be published. It will be your roadmap for organizing your batch content creation process.
Feel free to plan your content calendar as far in advance as you like. I like to make a quarterly plan on my content calendar. However, while a quarter makes sense when coming up with content for the calendar, it may be too many articles to batch during content creation.
For the batch size, don’t get too carried away. Start in smaller chunks and gradually increase as you become accustomed to it. Begin by batching three to five articles. If you create weekly posts, start by batching one month of content. Then adjust as needed.
3. Write Articles
With your content ideas and calendar in place, it’s time to start creating your articles. It’s often most efficient to focus on one article at a time. Begin with the first article in your batch. Create an outline, write a rough draft of the content, and then edit it. Repeat this process for each article in your current batch.
4. Add Visuals
Once you’ve written your articles, it’s time to enhance them with visuals and relevant media. Go through each article individually and determine where images, graphics, or charts can improve the content.
5. Schedule Posts
Now it’s time to schedule your articles using your content management system (CMS). This will vary depending on your system. Below are the steps for scheduling content in WordPress:
Go to Posts > Add New
Input your article content
On the right-hand side next to “Publish,” click “Immediately”
Select the date and time for the post to go live in the menu that appears
Once a future date is selected, the “Publish” button at the top will change to “Schedule”
Click “Schedule” when you are finished
6. Repurpose Content
While the priority is creating blog content, you can also repurpose this content for various platforms, expanding its reach and impact. Consider the following options:
Convert your article into a podcast episode: Reach audiences who prefer audio content and tap into podcast platforms to broaden your reach.
Create a video summarizing its main points for YouTube: Engage visual learners and leverage the popularity of video content on YouTube to attract new viewers.
Highlight content in an Instagram Reel or YouTube Short: Capitalize on short-form video trends to deliver quick, digestible content to your audience.
Use the Instagram carousel feature to build a mini-course: Provide value-packed, educational content in a visually appealing format, ideal for Instagram users seeking in-depth knowledge.
By repurposing your blog content into these additional media types, you can significantly enhance its value and reach. Many people prefer consuming content in video or audio formats, making these repurposed versions highly valuable. After preparing the repurposed content, schedule it to go live either on the same day as your blog article or further into the future.
7. Post Publish Routine
After your article is live, there are additional steps to optimize visibility. We have a comprehensive post publish routine to follow that includes actions like optimizing internal linking, sharing with your followers, and embedding repurposed forms of media in the page such as a YouTube version of the article.
8. Utilize ClearPath Online
To streamline your blog content management, consider leveraging ClearPath Online. The ClearPath Online platform combines digital marketing coaching with an interactive digital marketing planner. It is designed to help boost your blog audience, while making it easier to stay on top of your content strategy.
In Summary
Many bloggers have found great success in batching content, including Amy Porterfield. She not only batches content, she now does what she refers to as “Mega Batching.”
I wanted to mega batch our podcast. That means we would batch the podcast ideas and then we would batch our outlines for our podcasts. We would then batch my podcast recordings and then we would batch the writing that goes into each podcast, the show notes, the emails, social media, and all that good stuff. We would batch that as well. This is not just batching but mega batching.
Amy Porterfield in episode 182 of the Online Marketing Made Easy Podcast
Batching blog content is the key to maintaining consistency and freeing up time for other projects. By batching your content, you can complete more in one sitting, allowing you to dedicate your remaining time to business growth. Conversely, creating new content every week can feel like treading water. Batching content is the strategy that empowers you to get ahead so it’s possible to focus on projects beyond content creation.
Do you want to listen to this article? Here’s the podcast episode:
It’s important to have a strategy for WordPress categories and tags so you are using them in a manner that makes sense for your readers. The technical aspect of adding categories and tags to a post in WordPress is straightforward. What’s much more complicated is understanding when and why to do it. So, I’m going to talk about strategy and how to decide which categories and tags to add to each article. Here’s a strategy for how to use categories and tags in WordPress.
Think of Categories and Tags as Collections
Both categories and tags should be thought of as collections. You’re creating collections of content. Once you think of them in that manner all of the other decisions are simpler and make more sense.
Don’t Duplicate Categories and Tags
Now that we’re thinking of both categories and tags as collections, there is no reason to duplicate them. A collection of cookies is a collection of cookies whether it’s a category or a tag. Having two identical collections isn’t a benefit for the reader. It makes no difference to the reader that you consider one to be a category and one to be a tag. It doesn’t add any value. So, there’s no need to have both.
Aim for One Category
Try to only add one category to each article. It should be the one category that best describes the article. This is sometimes easier when you leverage parent and child categories. If you can assign a post to a child category, it can be part of the larger parent category as well without needing to assign it to multiple categories.
Only Create Tags for Items Worthy of a Collection
When creating tags remember you are creating a collection. Don’t create a tag if it’s so specific that there will only ever be one article in it. What happens then is that the tag page will be competing with your article. Since it would make more sense for the reader to go directly to the article than viewing a collection of one article, just skip the tag so it’s more likely the article will be found instead.
Do What’s Best For Your Readers
The primary strategy to follow when creating categories and tags in WordPress is to always do what’s best for your readers. If multiple categories make sense for your site and help your readers, then do it. But, likewise, don’t add as many tags as possible because you think it’s helping SEO. Add them only if it makes sense for the people you want to attract.
Do you want to listen to this article? Here’s the podcast episode:
Creating consistent blog content is important. You know you need to create a content plan and write your content in batches. But, scheduling your blog post doesn’t mean it’s done. Once the article is published there are a few tasks you’ll want to do to further optimize your content. Here’s what to do after publishing a blog post.
I like to break up my post publishing blog routine into four different categories. They are grouped into: site improvements, internal linking, social outreach, and SEO.
Post-Publish Site Improvements
After you publish a blog article there are a few places on your website that can be modified to help optimize the new post.
Disable and Redirect Any Outdated Version
First, if the article is an update instead of an entirely new article, make sure to disable the old article and add a 301-redirect. Of course, this only applies if the updated version is a completely separate page from the original version.
Embed Media
If there are any additional media sources that can be embedded now that the article is live, such as a podcast or YouTube video, then add them.
Add to Category Pages
Add the article to any relevant category or resource pages. It’s possible your site is set up to do this automatically. If not, just take care of it manually.
Post-Publish Internal Linking
Add Internal Links FROM Related Articles
Review any existing articles on your site that can be related to the new post. If there’s an opportunity to add an internal link to the newest article, do it.
Add Internal Links TO Related Articles
The opposite is true as well. Look at the new blog article. Make sure you are linking out to any existing articles wherever you have relevant content.
Use a tool such as Canva to create a graphic to use for a social media post. Whether your primary network is Instagram, Facebook, Twitter, or LinkedIn; a nice graphic will increase the chance people will stop scrolling to read the post.
Schedule Social Media Shares
Schedule out as many social media shares as reasonable for the article. You don’t need to use as many social networks as possible, but schedule shares on the social networks that you have decided work for you and your audience.
The trick is to not share the identical post every time. Instead take a quote from the article, change the headline into a question, or share different subheadings. Find different pieces from the article to share. That way, you can share the same article multiple times, but it isn’t annoying for your biggest fans. And if someone wasn’t interested the first time, maybe they will resonate with a different part of the article and decide to click on a later post.
Space out the shares however you feel comfortable. I normally share about two weeks after the first post and then monthly after that.
Send to Email List
Make sure to send the new article to your email list. Either send it as a one-time blast or add it to a sequence. If you already have a sequence of content you use as your newsletter then add it where it makes sense in your sequence.
If it is timely content related to a current event or if you don’t have an email service provider that allows sequencing, then just send it as a one-time email.
Post-Publish SEO
Confirm Keyword Placement
Confirm the primary keyword appears in the Title, H1 tag, and first paragraph.
Write Meta Description
Confirm there is a meta description with the keyword included.
Track Rank
If you use a tool such as Ubersuggest to track rank, add your new keyword so it is easy to monitor.
That’s it, that’s the routine! Writing content can be time consuming. So, you want to make sure you’re getting as much value out of the content as possible. Following this post-publish task routine will help ensure your content starts ranking and bringing in traffic.
Do you want to listen to this article? Here’s the podcast episode:
One of the most challenging parts about blogging is being consistent. And consistency happens to be an important piece. One of the best ways to tackle this is to create a blog content calendar. We’ll go over everything you need to know to create a content calendar for your blog.
What is a Content Calendar?
Before we can discuss creating a content calendar, we need to understand what it is. A content calendar organizes your content ideas and assigns them to publish dates. The specific medium used to create the calendar can vary. It can be a spreadsheet, post-it notes, or even an actual calendar. It is a system that allows you to organize your content ideas based on when they will be published.
Why have a Content Calendar?
The content calendar helps you create a plan. It makes it easy to understand what to work on to stay on track. It helps hold you accountable.
Instead of a list of random ideas, the content calendar has a specific timeline. You have committed the content ideas to publish dates. Of course, it’s easy enough to make edits and change the schedule. But, it is easier to be consistent when you already have a plan. Content calendars allow you to commit to deadlines and plan ahead.
How to Create a Content Calendar
Step 1: Determine Posting Frequency
You’ll need to determine a posting frequency. Ideally, you’ll want to post weekly content. The most important part about your posting frequency is to be consistent while focusing on quality over quantity. So, if your schedule doesn’t accommodate weekly high-quality content updates, then aim for a schedule that gives you more time. You can post every other week or monthly instead. The more posts you’re able to create, the faster you’ll see your search engine traffic grow.
Step 2: Create a Spreadsheet
My go-to tool to create a content calendar is Google Sheets. Creating a spreadsheet is simple and gives lots of flexibility.
To get started with a content calendar, you can download the free Google Sheets template below.
To create your content calendar list out your post schedule dates based on your posting frequency. If you plan to post weekly, you’ll add a date for each weekday you plan to publish a new post. Then, in another column, document the article topic that will be posted that day.
You can also add any columns you’d like to carry over metrics you found during the keyword research stage. If you use the template above the metrics will automatically appear on the calendar tab when you select the topic using the dropdown list.
Step 3: Plan out Next Quarter
Assign topic ideas to every day you want to publish a post for the next quarter. So, roughly three months. If you have more ideas, do the full year. Keeping blogs current takes time. Get the keyword research out of the way so you have a full calendar ahead of you. That way, when you have blog time you can focus on writing and batching your posts instead of figuring out what to write next.
In Summary
A content calendar helps you stay organized. If you commit your content ideas to dates, it will be easier to blog consistently. Having a plan will help keep you moving in the right direction and make it that much easier to push forward.
Do you want to listen to this article? Here’s the podcast episode:
Blogging takes time, which is limited for an entrepreneur. So, when you’re starting and building your blog, you’ll likely be wondering, How often should I blog for my business? The answers to this range anywhere from daily to monthly. Let’s go over how to determine the frequency that makes the most sense for you and your site.
Blog as Often as You Can
You should blog for your business as often as possible, but don’t worry about recommended time schedules if you know you can’t commit to them.
The more you publish, the quicker you’ll see results. However, if you start with an overly ambitious schedule and decide to blog every day, it might be challenging to stick to. You might perfectly carry out your blog schedule for two weeks but then get burned out and take a break for three months. Well, those 14 blogs could have been scheduled out weekly for three months instead. Even though the articles would have taken longer to be published, search engines and readers would have seen that you have a regularly updated blog, which would likely provide more long-term value.
Aim for Weekly Blog Updates
I like to aim for weekly blog updates. Once a month, I create a batch of four to five blogs, or however many I need to post an update each week for the upcoming month. When I first started, I only blogged monthly. Each month, I’d create a blog and schedule it out. As I got faster, I switched to blogging bi-weekly. I was producing two blogs each month, but it wasn’t taking any more time because I was writing faster and had better routines in place. Eventually, I could post an article every week and still use my same once-a-month placeholder time for content creation.
Start slow. Although monthly blog updates won’t grow your website as quickly as weekly or daily updates, it’s a good start and helps you ease into the process. That said, I do recommend aiming for weekly updates. If you start with monthly updates, make sure you’re aware of what’s using your time and brainstorm how you can create new blog articles more efficiently to increase the number you’re able to publish.
Keep Your Updates Consistent
Consistency is more important than frequency. You want search engines and readers to know how often you post. That helps search engines understand how often to crawl your website and helps readers understand when to return; it also helps show that your site is well-maintained and provides fresh content and information. So, instead of choosing an ambitious posting frequency, choose one you can commit to long-term.
Focus on Quality Over Quantity
You always want to focus on quality over quantity. This is another reason a less-frequent posting schedule could be optimal. Don’t post so often that it’s all-consuming and prevents you from moving your business forward. You need to have time to make sure your content is top-quality so it can outrank competitors; this includes creating graphics, adding images, and formatting it in an easy-to-read manner. You also need time to update old articles so that the content stays current.
Do What Makes Sense for Your Audience
Although more content offers you more opportunities to rank in search engines, always keep your audience in mind, as well. Don’t publish content purely with SEO in mind. Publish content with topics and consistency that make sense for your readers.
My audience is busy. They don’t have time to read an article every single day, so I would never switch to daily blog updates because it wouldn’t make sense for them. My time is better spent either by improving the ClearPath Online marketing tool or answering questions and helping with one-on-one issues.
In Summary
Choose a blog posting schedule that makes sense for you and your audience. If you can post weekly, start there. Commit to a regular schedule and stick to it.
Do you want to listen to this article? Here’s the podcast episode:
Selecting a name for your blog can be a challenging task. Opt for a clever brand name? Or should my blog be my name? As with many questions in the realm of digital marketing, it depends. There are advantages and disadvantages to both options. Let’s dig into the pros and cons of using your personal name for your blog and when it’s most suitable to do so, as well as when a brand name might be a better choice.
The PROS of Using Your Personal Name for Your Blog
Helps People Connect with You as a Person
Using your own name for your blog creates a personal connection between you and your readers. Rather than perceiving your content as coming from a faceless entity, readers are more likely to see it as advice from a trusted friend.
Allows You to Switch Topics
A personal blog provides the freedom to explore a range of topics that reflect your unique interests and experiences. While it’s advisable to focus on a handful of related topics to avoid confusion to your readers, you can adjust these topics over time as your interests evolve.
Brand Yourself as an Expert
Creating a blog using your name allows you to establish yourself as an authority in your chosen field. This can be particularly advantageous for potential employers seeking to understand your expertise and knowledge.
The CONS of Using Your Personal Name for Your Blog
More Difficult to Remember and Spell
Depending on your name, it may be harder for people to remember or spell correctly compared to a brand name, which is often designed to be more memorable.
Unclear Blog Focus
The flexibility of a personal blog can be a drawback as well. Your site’s purpose may not be immediately clear to readers and search engines, making it challenging to rank in search results and connect with your target audience.
Potential Difficulty in Selling
Using your name as your blog’s brand may complicate the process if you ever decide to sell your blog. While it may not be a current consideration, it’s wise to keep future options open.
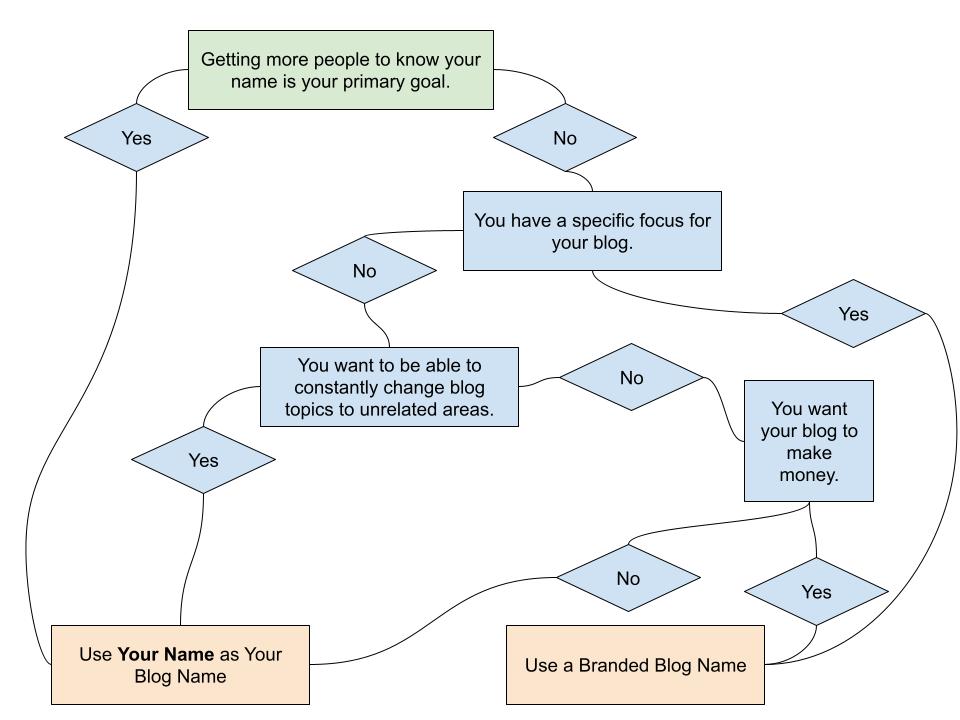
How to Decide if Your Blog Should Use Your Name
Use Your Name for Your Blog if:
Personal branding is your goal.
You’re aiming to enhance your job prospects and expand your social network.
You intend to use your blog as an extension of your resume.
Use a Brand Name For Your Blog If:
Your goal is to build a business.
You’re selling a product or planning to do so in the future.
You view your blog as a business venture and are less concerned about personal branding.
What Others Have Done
Here are some examples of some popular bloggers and how they use their name with their blogs.
Amy Porterfield – Amy Porterfield uses her name for her domain name (https://www.amyporterfield.com/). She does have separate names for her blog and courses but her name always accompanies the product names because it is her primary branding.
Jasmine Star – Jasmine Star has a personal brand (https://jasminestar.com/) and then a separate business brand (https://new.socialcurator.com/). Her name and face is on the business brand as well but it is built to stand alone separate from the Jasmine Star brand. Her podcast and messages that come directly from her are typically on the personal brand and not the business brand.
Michael Hyatt – Michael Hyatt focuses on a business brand at https://fullfocus.co/ instead of using his name. This is actually a change from the original setup and the website even has a page explaining the rebrand.
These examples show there isn’t one right way to do it. Sometimes your blog can use your name, sometimes it makes more sense for it to not, and other times you may even decide to have multiple sites with multiple blogs.
SEO Impact
The domain name does play a role in site rankings for search engines, though it is very minor. It is such a small factor that it is not worth considering the impact on search engine rankings when deciding if you should use your personal name for your domain name or not.
If it is important for your website to be the top result when your name is searched, having your personal name for the domain name will make that easier and quicker to obtain. But it is still possible to do this with a branded domain as well.
If you want your branded domain to rank at the top for your personal name then make sure you have a page dedicated to the founder and explain your contribution to the website. If the page is clearly about you and your name is optimized in the page title and headings then that page will be able to rank high in the search engine rankings when your name is searched.
The opposite of this is also true. A branded domain name will make it slightly easier to rank for a product or niche, but if the personal domain has relevant content about that topic it could also rank well in those areas.
Include Your Name Either Way
Regardless of your choice, it’s essential to include your name prominently as the author of your articles. This practice helps build trust and increases your blog’s credibility.
Verify the Domain is Available
Before finalizing your decision, check the availability of your chosen domain name. You can do this easily using the Namecheap Domain Name Search tool. Once you’ve made your choice, secure the domain name promptly.
In Summary
In general, a branded blog name provides more paths for monetization than a personal blog name. However, if building your personal brand is your primary focus, a personal blog name can be an excellent choice. Regardless of your decision, the key is to get started, create your blog content, and gain insights into your preferences. Remember, you can always adjust your approach in the future if needed.
Do you want to listen to this article? Here’s the podcast episode:
Let’s start at the beginning. What is a blog? Aren’t blogs those websites people use to talk about themselves and rant? Why would I want one for my business?
A blog contains regularly updated informational content which is displayed on a website. The blog article topics are generally related to the overall focus of the website. Of course, you can choose to rant about your day, but that isn’t commonly found on business blogs.
Why Should I Have a Blog?
A blog provides you an opportunity to add content to your website that isn’t directly related to your core product. This allows you to optimize the pages of your website for keywords and phrases that wouldn’t naturally appear on your main landing pages. This content can help you target an audience higher up the funnel process. You can bring some new people to your site before they have realized your product could help them solve a problem.
How to Configure Your Blog
Where Should the Blog Live on Your Site?
There are two common places where you would put a blog on your website. The first place is as a subdomain, such as blog.yoursite.com. The second place is as a directory, such as yoursite.com/blog. The other place you might see a blog is right at the root of the homepage, such as yourblogsite.com. Since it should be clear to you if your blog belongs on the homepage, we will focus on the subdomain and directory placement options.
The Difference Between a Subdomain and a Directory
The number one most significant difference between a subdomain and a directory is that a subdomain (blog.yoursite.com) is considered a separate site, whereas a directory lives on the root domain.
What that means is a subdomain keeps your blog completely separated from your main website. This can be beneficial for a couple of reasons. You can link to relevant pages on your main site from your blog site, and they will count as external links. This setup also gives you a little protection if you receive a ranking penalty. Since it is considered a separate site, the penalty won’t necessarily apply to your main website.
One of the main downsides of setting up your blog as a subdomain—and the primary upside for setting it up as a directory—is that any backlinks your blog site acquires won’t directly benefit your main site. This is one of the principal reasons to set your site up as a directory. Typically, your blog’s primary goal is to reach a larger audience through social shares and backlinks. If your blog is a directory on your root domain, those backlinks help increase your root domain’s backlink profile.
To decide if your blog should be a subdomain or a directory, you have to think about your blog’s goal and what’s best for your readers. For small businesses, having a blog as a directory is typically the smarter option.
Do All Blogs Have Comments?
Traditionally yes, blogs have comments. These days, however, more and more companies are removing commenting systems from their blogs. About fifty-percent of blogs have a commenting system in place. Some companies find they spend a considerable amount of time maintaining the comment system and the vast majority of comments are low-quality or spam.
With that being said, a company would want to have comments on a blog to build a sense of community. It provides a way for your readers to reach out and ask questions. This not only gives you a channel to communicate directly with people and publicly offer exceptional service, but you can also take these comments and feedback to get ideas for new content and new questions to answer on future blog articles.
Another benefit of having comments on your blog—and arguably the most practical reason—is that they keep your blog article fresh with keyword-rich content. New comments make the piece appear current and updated. When people add comments to blogs, they naturally use keyword-rich phrases more often than you can insert them organically to the main content piece.
Like any other online marketing tactic, you need to decide if comments make sense for your demographic and your blog’s goals. If you decide a commenting system is right for your blog, make sure you maintain it. When appropriate, reply to people and make sure to remove spam to keep a high-quality blog.
Do Blogs Need Social Share Icons?
Almost every blog makes it easy to share on popular social networks. The most common purpose for a business to maintain a blog is to increase traffic to their website. One of the main tactics to do this is for people to share the content on social media. Why not make this easy to do?
If you’ve decided it makes sense to have a blog for your business, you might as well make it easy for people to share the content. If you don’t, you’re missing an ample opportunity.
What makes this an even more straightforward decision is that there are so many free tools these days to make this a super simple experience, both in regards to technical implementation and the user experience. Some of the most popular social share tools today are AddThis, ShareThis, and AddToAny.
How Often Should I Update My Blog?
The easy answer is: as often as possible. It’s recommended that you post a blog article a minimum of once a week. Large companies will post much more often than that, anywhere from three times a week, to every single day, to multiple times a day.
I would recommend setting up a blogging schedule that makes sense for you and your business. Do you have time to blog every day? Great! Then do that. Do you only have time to do one blog a month? Well, one blog per month is better than no blogs. Start with that. The most important thing is to keep a consistent blog schedule.
If you have the time and resources necessary, commit to a weekly blog article. Otherwise, create a schedule that works for you and stick to it.
So, Do I Need a Blog?
About eighty-percent of the top business websites have a blog. If maintained, a blog can be a great traffic resource and expand your audience and bring new people that may not have been directly searching for your product.
Content is a vital piece for search engine optimization. The content on your site is the valuable asset you want search engines to provide to users. So, how do you know what content is the right content for you to direct your focus? Let’s go over three different scenarios.
Scenario 1: Your website already has excellent content on all of your product pages. You already have a thorough FAQ section, and your website answers every question people have about your core product. But you want to keep expanding content and get more traffic. Then yes, build a blog!
Scenario 2: Your website doesn’t have great existing content. But you aren’t worried about that. You have enough time or resources that you’ll be able to continue to build out landing page content for your core product while creating and maintaining a blog. Then yes, build a blog!
Scenario 3: You’re just getting started. Your website doesn’t yet clearly describe your core offering. You have limited time and no budget. In this situation, where you feel forced to choose between starting a blog and creating product-specific landing pages on your main website, start by optimizing and maximizing your landing page product copy. But as soon as you’ve taken care of that, start focusing on your blog articles.
A blog is essential, and it’s beneficial for business websites to maintain one. Find a blog schedule that works for you and stick with it.
Do you want to listen to this article? Here’s the podcast episode:
When you're building a blog, one critical component is having a plan to grow your newsletter subscribers. The goal is to turn casual readers into devoted fans. Here's how to make that happen and grow your newsletter subscribers along the way.Read More
Blogging provides an incredibly empowering outlet to potentially change lives - both your own and those in your future community. Here are five reasons why you should become a blogger.Read More
ENROLLMENT NOW OPEN! Register for the free How To Do SEO Yourself online course.