Adding hashtags to Instagram posts helps to increase the reach. It makes it easier for people to discover the content. The trick is to use the right hashtags for each post. That means, use the hashtags that are popular but not so popular that your post gets lost. And keep it relevant, don’t reuse the same hashtags for every post. Instead of choosing random hashtags, create a strategy to increase discoverability chances. Here’s an Instagram hashtag system you can follow.
To simplify the hashtag system, you can download the free Google Sheets template below.
Step 1: Generate the Hashtag List
The first step is creating a list of hashtags you would want your posts to rank for. Add any ideas you have to your list. Your list will have more hashtags then you end up using. This allows you to track hashtags and adjust your system as trends change in the future. (We’ll talk about that more in step 3.)
To generate ideas go into Instagram. In the search screen click on Tags. This allows you to search hashtags. Start typing in any ideas you have and then the search will autosuggest hashtags. Add any relevant suggestions to your list.
If you downloaded the template above, the ideas will go on the first tab labeled Hashtags.
Document the Number of Posts
Displayed under each hashtag in the Instagram search autosuggest dropdown are the number of posts using that hashtag. (You won’t see the number of posts there if you’re following that hashtag. In that case, the number displays at the top of the hashtag screen when you click on it.)
When you add the hashtag to the spreadsheet, also document the number of posts currently associated with that hashtag. This doesn’t need to be an exact number, instead document the range this hashtag is within. That way it’s easier to group hashtags by popularity.
There are six different buckets you’ll want to group your hashtags into. These are all based on the number of posts within the hashtag.
Bucket 1: Under 20k
This bucket contains hashtags that you can ignore for now. There isn’t enough interest to focus on them right now but you want to keep them on your list. That way you can watch them in case trends change.
Bucket 2: 20k – 49.9k
These are okay terms to focus on. They have some interest and if they are relevant you should use them. If you are at your max number of hashtags already you can leave these off though because they are low priority.
Bucket 3: 50k – 199.9k
These are good hashtags to focus on and these will likely account for the majority of hashtags you use.
Bucket 4: 200k – 499.9k
This is the sweet spot. These are the best hashtags and if you can include one or more, start with those.
Bucket 5: 500k – 2m
These hashtags aren’t worth focusing on. They are so popular that they get crowded fast. That means there are less opportunities for people to discover your post.
Bucket 6: 2m+
And these you want to completely stay away from. No one will see them. These hashtags are far too congested and there is little opportunity to stand out.
Step 2: Assign Hashtags to Post
Once you have your hashtag ideas in place use them to add hashtags to Instagram posts in a strategic manner.
How Many Hashtags to Add
Instagram allows no more than 30 hashtags on each post. When selecting the hashtags to use on your post don’t stress about using all allotted hashtags. Select the hashtags that are most relevant. If you only have 3-5 relevant hashtags, then stop there. Don’t add more to have the most possible.
You do need to be aware of the maximum number of hashtags. That way you can make sure you don’t exceed the amount. If you do, make sure you remove the hashtags in the buckets with the lowest number of posts first.
How to Select from Your Hashtag List
Organize your list of ideas based on the six post number categories. Highlight the rows with buckets 2-4 so it’s easy to identify the hashtags you want to focus on. Go through the hashtags one-by-one starting with the most popular hashtags (bucket 4). Work your way towards the less popular hashtags until you’ve selected all relevant hashtags.
Once you’ve made your selections you want to confirm you have 30 or less selected. If you’re using the template click on the second tab labeled Summary. Look for where it says # of Hashtags and make sure that number is 30 or less. If you aren’t using the template, count them up instead.
The Summary tab on the template will also include an easy way to copy and paste your hashtags. All the hashtags you selected are in one cell already spaced out with hashtag symbols. Copy that one box with the hashtags and then paste it into Instagram.
Where to Add the Hashtags in Your Post
Whether you post in your first comment or add a separate comment with hashtags doesn’t matter. That’s a personal preference. It doesn’t impact the algorithms or change the number of hashtags you can use. So choose a method that works for you and go with that.
Step 3: Maintain Your Hashtag List
To continue to get a benefit out of your hashtag system, you need to keep it updated. Trends will change and new hashtags will begin to be popular. Every quarter (every three months) review your hashtag list. Update the number of post buckets for the existing hashtags. And go back to the Instagram hashtag search to see what new ideas appear in the autosuggest list that you can add to your spreadsheet.
If you need help staying on top of this, you can use the ClearPath Online DIY SEO Tool. It’s pre-populated with tasks just like this so you don’t have to worry about remembering when it’s been three months and you need to updated your hashtag list again.
This will keep your hashtag list current. And it will provide new hashtags to improve Instagram discoverability.
Do you want to listen to this article? Here’s the podcast episode:
What role does Quora play in digital marketing? Can Quora help with Search Engine Optimization (SEO)? Here are three ways how Quora can benefit your site.
What is Quora?
First, let’s go over what Quora is. Quora is a question and answer website. There are countless topics. Any question can be asked and anyone can answer it. Answers can be upvoted and downvoted so when you look at a question ideally the best answer is at the top.
3 Ways Quora Helps Your Website
Referrals
Quora can be a good source of referrals for your website. Quora ranks well in search engines. It has a global Alexa rank of 380 which means it is a popular site and there’s a good chance it outranks your blog.
When you answer a question on Quora you can add a link. That link will be a no follow link. That means, it won’t directly impact SEO as a backlink. It will however be a source of referrals.
Quora ranks well in search engines. If someone searches in Google for a question related to your business a Quora result may appear. If you’ve provided an answer and included a link to a specific page on your website (since the question is relevant to your business) there is a chance that person will click through to your website.
So, the benefit of links on Quora isn’t to increase the number of backlinks to your website. The benefit of links on Quora is to help your target audience find the content on your website that can help them during the research stage.
Content Ideas
Another benefit of Quora is the understanding of the main questions and concerns that your target audience has. When you review and answer Quora questions on a regular basis you begin to become familiar with the common questions. If you already have content on your website that addresses these questions, great! Chances are though, you will find topics that keep coming up that you can answer but you don’t have a relevant link on your website to link out to.
This is a great way to identify content gaps on your website. Create an article that addresses the exact problem. This not only adds more content to your website, it also gives you another page you can link to when you are answering these questions.
Customer Service
Once your brand grows to the point where you have a following, you will start to find questions about your product directly on Quora. Use Quora for customer service. Take the opportunity to answer the questions yourself instead of letting the public respond.
Before your brand gets to that point, you can still use it for customer service by responding to general inquiries about your product or industry. When the question is not asking about your exact product it doesn’t hurt to include some competitors as well if that is the best way to answer the question. It’s important to always answer the question as completely as possible and don’t get too distracted trying to make it about your business. Think of the original poster’s concern first.
In Summary
Using Quora on a regular basis can benefit your website. Even though the links are no follow links they are still worth having. The links can increase your website referrals, you can gain content ideas through question insight, and you can even help stay on top of customer service concerns.
Do you want to listen to this article? Here’s the podcast episode:
You know you should have your business on social media networks. You’ve already heard how important social media is, and how every business has to be on social media these days. You’ve played around with social media personally, and might have even created an account for your business on one or two platforms. But what you are missing is a strategy for how social media will positively impact your business. Let’s walk through what you need to know about social networking for business.
Choosing the Right Social Networks
Let’s back up one step. Which networks specifically should you focus on for your business? Where should you create a profile? Everywhere, right? You never know which one will be the next big thing.
Wrong! If you get excited about new social media platforms, then go ahead, sign up and claim a custom URL for your business. Snag it early so you have an account if or when you choose to use it.
Focus on only one to three social networks
However, what you want to do is choose one to three social networks to focus on. If you try to focus on everything, you’ll get burned out and end up accomplishing nothing. So, instead, determine the one to three networks you want to focus on, and don’t worry about the others.
Re-evaluate Annually
If you’re concerned about missing the next big thing, choose a schedule to re-evaluate your networks. New networks don’t often have a large audience, so you don’t need to worry about being an early adopter for your business. Looking at the top social networks on an annual basis, and choosing which ones you’d like to focus on for the year should be enough to stay current on popular networks.
Figure out where your audience is
How do you choose the right networks for your business to focus on? You want to figure out where your audience is and concentrate on them. Choose a social network that has your targeted demographic. You can review your social data in Google Analytics. You can also look at social media demographic studies to get an idea of which networks might be a good match.
Choose based on demographics
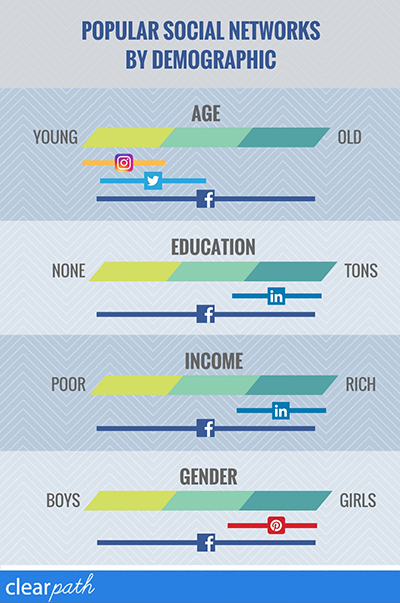
Facebook is almost always a good choice. There are more people on Facebook than any other social network and they have a broad range of demographics. If you’re targeting a younger audience, Instagram and Twitter are both good options. For college graduates and users with a higher income, LinkedIn is a good option. If your demographic is women and your content is visually appealing, you should look into Pinterest.
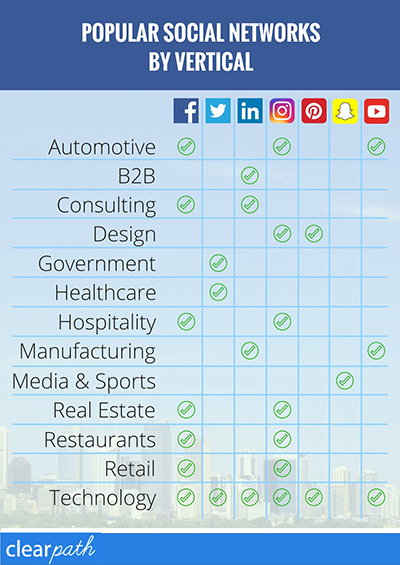
Choose based on your vertical
Sometimes a social network makes more sense for one industry than another. For example, retail typically performs well on Facebook and Instagram. Instagram makes it easy to showcase inventory, and Facebook gives customers an easy option to communicate with your company. If your business is in the B2B space, LinkedIn is a must. For high regulatory industries, such as healthcare and government, it can be difficult to determine which networks make sense. Twitter has proven to be a great network for those industries to communicate with the public.
If you’re in technology, people expect you to be aware of trends, and be able to find your company on whatever social network they want to look at. Users expect to find technology companies on Facebook, Twitter, LinkedIn, Instagram, and even Pinterest. But, don’t stretch yourself too thinly. I have recommended that you choose one to three networks, and I meant it. Unless you have a team to support your social efforts, limit yourself to the most effective networks. Decide on the top networks for your business. If you’re a B2B company, focus on Facebook, Twitter, and LinkedIn. If you’re a B2C company, decide what makes the most sense. You can probably skip LinkedIn, and instead focus on Facebook, Twitter, and Instagram.
Look at Your Competition
It’s always a good idea to keep an eye on your competition, and social media networks are no exception. Take a look at not only what networks your competitors are on, but see which ones actually have a large following. You can use Buzzsumo to get an idea of which networks are working for your competitors and what types of content users want to see on those networks.
Create Your Profile(s)
Once you’ve decided on the networks you want your business to focus on, create your profiles. Be thorough, fill out everything!
Take advantage of every profile field. Add images and information about your business. This will help make it easier for people to find you. Not only people who know your business, but people who don’t know you but need the solution you offer.
Once you get everything set up, use it! Share posts, leave comments, and participate. Don’t only talk about your own company. Find a way to educate or entertain people. Try and keep self-promotional posts to around 20% of your social content and spend the rest of the time adding value.
Do you want to listen to this article? Here’s the podcast episode:
Building a community on Facebook can be a powerful way to connect with your audience. Talking to people, understanding their pains and frustrations, can be beneficial for product development and growth of your company. But, eventually you get to a point where you want your Facebook fans to be able to easily connect with your website and subscribe to your list. You don’t want a 3rd party network, such as Facebook, to be your only route to talk to these people. That’s when you want to add a custom welcome tab on Facebook.
What the Welcome Tab Won’t Do
First, before we dig into how to add a custom Facebook welcome tab, let’s talk about the history of the welcome tab on Facebook. In the past, this has been an amazing feature. Unfortunately, a lot has changed and it simply does not do what it used to do.
It Won’t Be a One-Click Setup
It used to be that you can add a custom welcome tab by clicking one install button on a Facebook page to install an app. That is no longer the case. You can’t set it up with an app install. There is no option already in your Facebook page manager. You will need to use the Facebook developer tools.
It Won’t Be Editable in Facebook
You won’t be able to edit HTML directly within the tab on Facebook. Instead, you’ll need to have the page hosted somewhere and provide a secure (https) link to Facebook.
It Won’t Be the Default View
You can create a custom tab and you can rearrange where it appears in your list of tabs, but you can’t make it the default. The Facebook default home tab will remain the default and the very top in the list.
Way back when, you could make a welcome tab that was the default view for everyone that landed on your Facebook page. You could even create it as an incentive for people to like the page. They would see one image with an incentive, then after they click like the tab image would change to reveal a coupon. Those days are gone. That is no longer an option.
It Won’t Be an Option for Everyone
And lastly, the biggest change, not everyone will be able to add a custom tab. There is now a prerequisite that the page must have a minimum of 2,000 likes.
How I Got 2,000 Facebook Likes Using 1 Image
Okay, so the biggest hurdle to add a custom Facebook tab right now is the 2,000 page like requirement. For a big business, this is no big deal. But for a startup, a blogger, or a solopreneur who is new to social and still building their audience, this can be a difficult goal to reach.
My Facebook page had less than 100 likes. So, before I could create my custom tab I first needed to gain over 1,900 likes. To speed this up, I ran a paid ad.
These days I focus on organic efforts over paid efforts. So, my process was simple and could have been far more optimized. But, these are the steps I took.
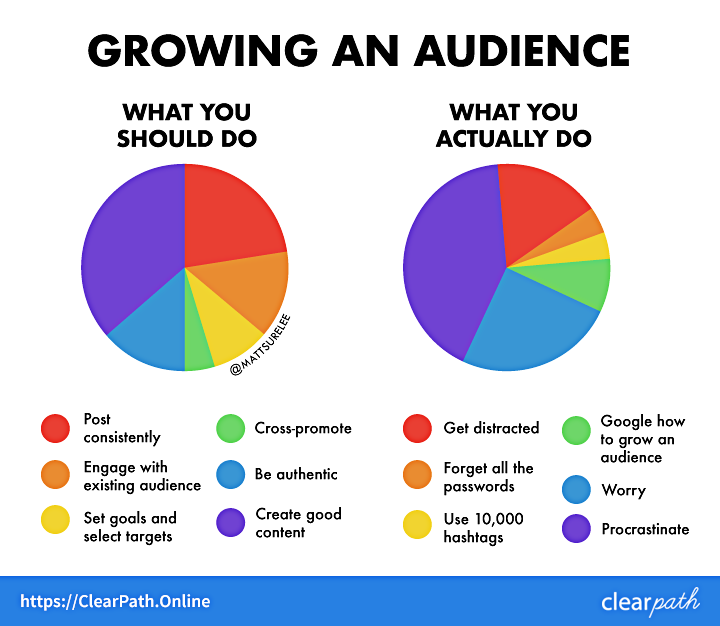
Step 1: Get an Image that Creates Emotion
The first step is to find the right image. You need to capture attention. The best way to do this is with emotion. You can use an image that creates anger and fear or joy and delight. I decided to go with humor.
I wanted an image that would resonate with my desired audience. Something that a blogger trying to do their own marketing could relate to. And, ideally, something they would want to share.
I decided to commission a chart by Matt Shirley. If you aren’t familiar with these charts, you should really check out his Instagram feed. He strikes a perfect balance between information and humor. Even though these charts aren’t factual, they are entertaining and often easy to relate to.
And for any marketer, whether a DIYer or a pro, charts and analytics are always an important and exciting part of the day. So, it seemed like a great fit.
I reached out, he pitched three brilliant ideas, we picked one and a week later I had my image.
Here it is:
Step 2: Target Your Audience
Okay, now that I had the perfect image to use in my ad, I needed to set it up on Facebook.
The ad itself was simple. I added my chart as the image. Then I wrote a small line of text. I wanted to encourage people to comment and engage on the post. So, I added text asking who could relate to the chart and put a raised hand emoji for myself.
The more difficult part was determining the best people to target. Now, you can keep the audience broad and the ad will be cheaper. That is not what I wanted to do though. Since I was already spending money on the ad, I wanted to reach the right people. I didn’t want my page to have 2,000 likes from the cheapest 2,000 people Facebook could find me. I wanted it to have 2,000 people that I have the potential of helping.
So, I limited my ad first by country. I targeted the United States, United Kingdom, and Canada. In Google Analytics I can see that these are the three countries that bring in the majority of my organic website traffic, so this made sense for my site.
Next, I restricted the ad by age. I know from my marketing personas what age range I’m targeting. So, I focused my ad on the age most likely to benefit from my product.
Lastly, I restricted the ad based on interests. I targeted bloggers, entrepreneurs, content marketers, affiliate marketers, and founders.
Step 3: Send Invites to People Who Like the Ad
Lastly, I engaged with people who engaged with my ad. I liked or replied to every comment. Sometimes both. To every single person who liked the post but not the page, I sent them an invite to like the page. Facebook makes this pretty easy. Just click to view the post likes and to the right of each name it will either say liked or it will have a button that says invite.
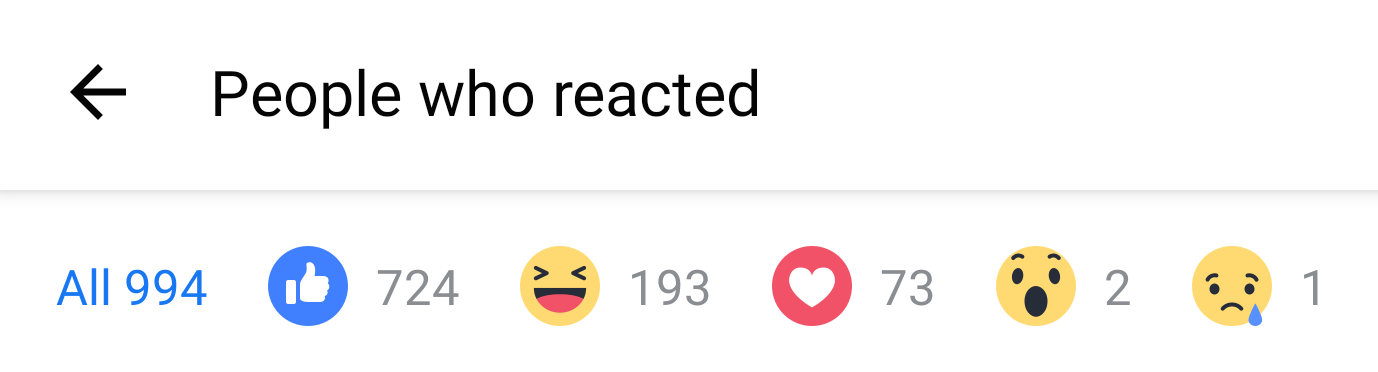
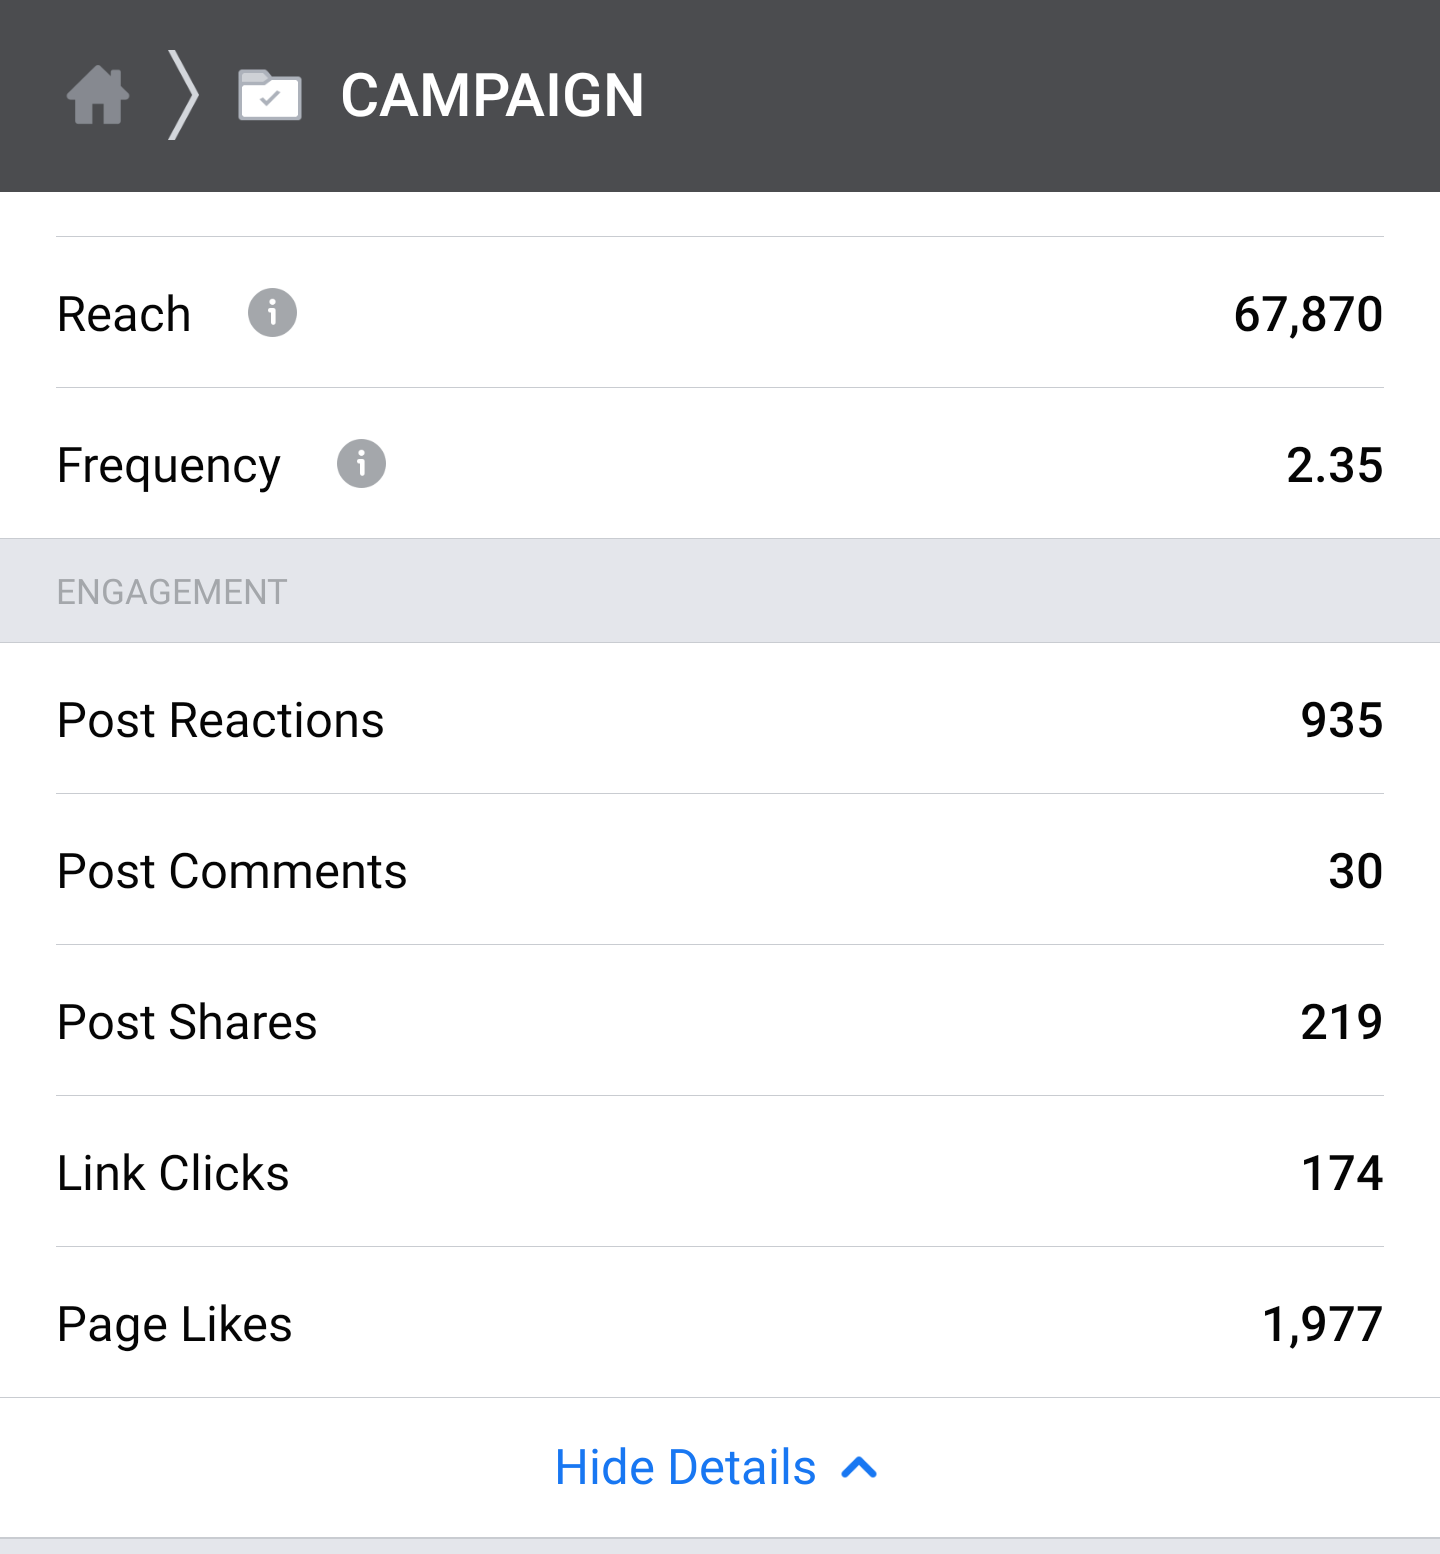
The post got 935 reactions, 30 comments, 219 shares and ended up getting me 1,977 page likes. It did its job. It was interesting, engaging, and people shared and liked it.
How to Create a Page in WordPress to Use as a Facebook Custom Tab
Once you have your 2,000 fans there is one other requirement you will need to deal with. You need a page to display the content you want to appear on your custom tab. Facebook is only going to allow you to give them a URL, so you need the page to live somewhere other than Facebook.
Adding a page to your existing website is going to be the easiest option since you already have that domain set up and hopefully secured with SSL. But, chances are you don’t want your standard website layout to appear on your Facebook tab. You probably don’t want your header or footer and the width constraints on Facebook are likely smaller than your standard website width.
You can hide those elements on a single page so you can use it as your Facebook tab content. I’ll explain how to do this for a WordPress website.
, create a new page and find the page ID. When you’re editing the page in the WordPress admin interface, the page ID will appear in the URL. At the end of the URL look for where it says post.php?post=. The 4 digit number that appears after post= is your page ID.
Next, preview the new page you are creating. Right click on the element you want to remove, such as the header. Click on Inspect. This will open the dev tools and allow you to view the code for specific page elements. This works in most browsers, I normally prefer to do it in Chrome.
Identify the class for the element you want to remove. If you have the element selected properly it should highlight the area when you hover over the code in the dev tools. In the code you’ll see class=. That will show you the class name(s). Copy that.
Then, in your WordPress admin interface, go to Appearance > Theme Editor. Go to your style.css file and add in a new style rule. You’ll take your page ID and your class that you copied from the element you want to hide and specify that it should not be displayed.
Here is an example of what the style rule would look like:
That says, on the page with the ID of 1234, for the navbar element with those particular classes, do not display it. That will hide the navbar only on page 1234.
Next, you need to go back to your page and add Facebook friendly content. Facebook specifies that the content should be a maximum width of 520 pixels and a maximum height of 810 pixels. To keep the content in those constraints you can add a div to the page, and then add all of your content within that div.
Here is what the div would look like:
<div style="max-width:520px;max-height:810px;">
… Your Content …
</div>
What to Put on Your Custom Facebook Tab?
What you put on your custom Facebook tab will depend on your goals and your brand. If you already have a lead magnet on your website, I’d start there.
If you have some kind of giveaway or freebie like a cheatsheet or free course that you use to get people onto an email list, add that to your custom Facebook tab. Embed your email subscribe form so people can sign up directly through Facebook. This will help you move your Facebook audience to a source you have more control over such as email.
How to Add a Custom Facebook Tab
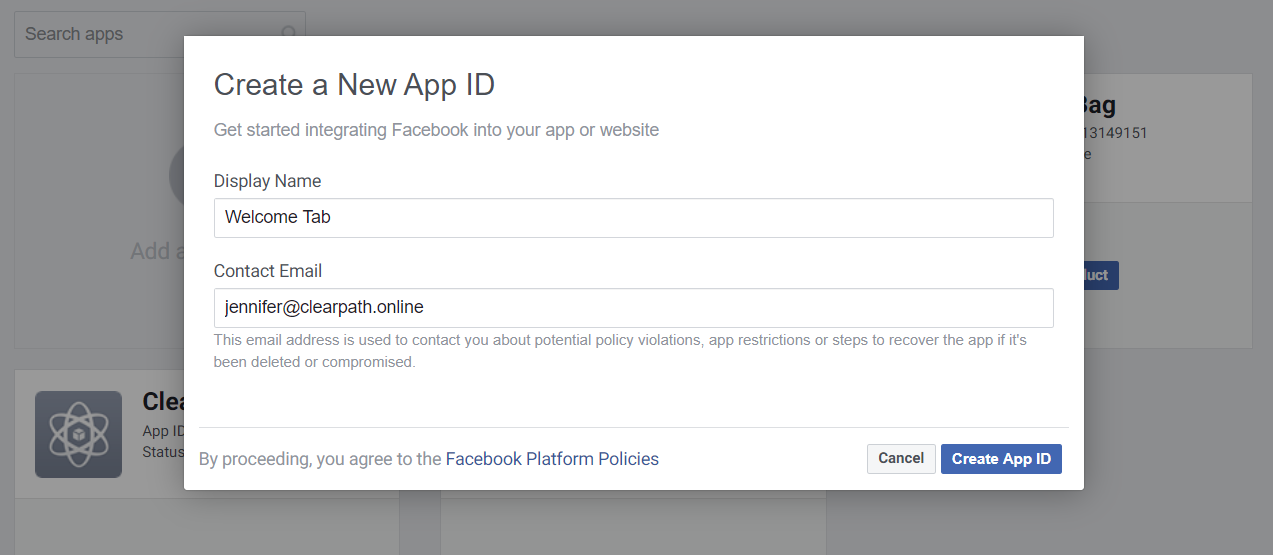
Okay, so now we have our 2,000 fans and content we want to display on the tab. We can finally add our custom Facebook welcome tab. Here is how you add it:
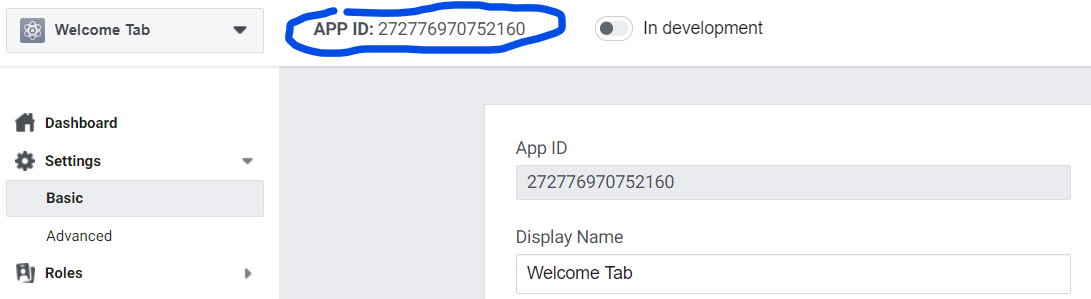
Enter the Display Name (the name you want to use for your welcome tab app) and Contact Email. Then click Create App ID.
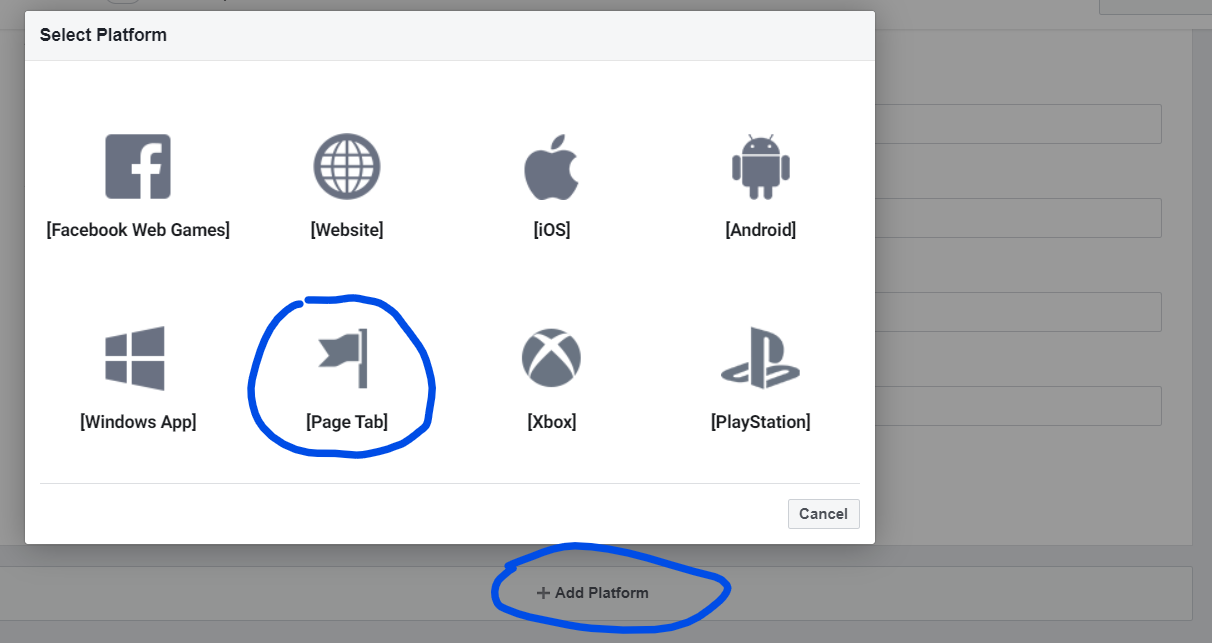
Navigate to Settings > Basic and then scroll down to the bottom.
Click Add Platform then click Page Tab in the box that appears.
Then enter in the secure URL (https) you want to use for your page tab and the tab name.
After you’ve entered in the details click Save Changes.
Now, the next step to actually implement the custom page tab app into your Facebook profile is not intuitive at all. I didn’t find any information from Facebook directly on how to do this, but I did find a very helpful article from Opace that explained the entire process.
To add the app to your Facebook page, you’ll need to copy and paste the following URL into a browser tab. You’ll replace the APP_ID and URL attributes with your own values.
The APP_ID attribute will be found at the top of the basic settings panel.
The URL attribute is the secure URL you provided earlier as the page tab contents.
When you enter the URL with the appropriate attributes you will be taken to a page with a dropdown to select your Facebook page. Select the page you want to add the tab to and press Add Page Tab. That’s it, now it’s added to your page.
You can rearrange the tab by going to your Facebook page. Then navigate to Settings > Templates and Tabs. Scroll down and you will see all of the tabs for the page. You can drag to rearrange them.
Was it Worth it?
The short answer is no. The long answer is it depends.
I’m glad I did it. I’m glad I have more likes and a custom tab. And, if I hadn’t, I wouldn’t be able to write this article or give advice on the topic.
Now, if you already have at least 2,000 likes then there really is no reason not to add a welcome tab. You might as well take every opportunity you can to get social followers on your website and list.
But, if you don’t have the social followers this is not a high priority item. I’m glad I have more than 2,000 likes now but it really doesn’t move the needle for my business. It’s more of a vanity metric than anything else.
Out of those 2,000 people, only 10-30 of them see each of my posts organically. If I want more of my audience to see my posts I have to pay Facebook to boost them.
Additionally, while it’s great that I have a custom welcome tab now, the tab is not ideal and has low visibility. It doesn’t appear at all on mobile, it’s only on the desktop version. Because of that, it’s only possible for a small percentage of my followers to ever see it. And, it will never be the first thing people see. You can’t replace the default Facebook home tab. People have to choose to click on another tab. Because of these restrictions it just doesn’t get very much visibility.
So, if you already have enough followers, then yes, you might as well add it. If you don’t, there are better ways to spend your time and money.
Do you have a custom Facebook tab? What content do you display on it and does it convert well? Let us know in the comments!
Do you want to listen to this article? Here’s the podcast episode:
To make life easier on Twitter you can try scheduling tweets. Scheduling your tweets is simple and can increase your followers and engagement if done right. We’ll go over the tools you can use and some strategies to follow when scheduling tweets.
The Benefits of Scheduling Your Tweets
Before we dig into how, let’s talk about why. What are the benefits of scheduling your tweets?
Consistency
One of the primary benefits is consistency. When you schedule your tweets you can post on a regular basis. This allows your audience to have a better understanding of when and how often they can expect to hear from you.
Less Likely to Neglect
Similar to being able to be consistent, scheduling your tweets makes you less likely to neglect Twitter. Social media is time consuming. When you have a business to run it’s easy to ignore social.
When you schedule out your posts ahead of time you can chunk your time to fit it in. Instead of it being a disruptive activity that you do every hour or so, you can choose a window of time once a week. You can even try to do it monthly if that fits best with your schedule.
Post at the Ideal Time
And lastly, a benefit of scheduling your tweets is you can post them at the times and days that you will receive the highest impressions and engagement from your audience. There are a few different ways to do this.
Export & Analyze Data: You can export your Twitter data through the Twitter Analytics interface. Then, you can analyze the data in a spreadsheet to determine the optimal days and times.
Scheduling Tool: Some twitter scheduling tools have automatic scheduling included in their system so your posts will be set to send at the optimal times. We’ll dig into the tools in more detail next, but Hootsuite and Buffer both have this option.
Hootsuite allows you to schedule posts on over 20 social networks, including Twitter, Facebook and LinkedIn. They make scheduling simple by including an auto schedule feature that chooses the best day and time for your audience. They also provide a drag and drop calendar view to easily reorganize your posts.
They do have a free plan but it is limited. You can only connect up to 3 profiles and you can only have a maximum of 30 scheduled posts. If those limits won’t work for you I’d recommend the Professional plan. It’s $30 per month but it let’s you schedule unlimited messages on up to 10 accounts.
Buffer is another good option. Specifically the Publish product. Buffer allows you to connect Twitter, Facebook, LinkedIn, Instagram, or Pinterest. You can set up a schedule using data from your audience so when you add a post it can automatically be scheduled for the next slot in your set schedule.
Similar to Hootsuite, the free Buffer Publish plan is pretty limited. They allow you to connect up to 3 accounts and set a maximum of 10 scheduled posts. Their paid plan starts at $15 per month but only increases scheduled posts to 100.
Twitter
Another option is to schedule posts directly through Twitter. To do this you need to go to Twitter for Business and then navigate to Twitter Ads. You don’t need to run any ads but you will need to enter your credit card information to setup the account. Once you finish the setup, you can navigate to Creative > Tweets to schedule out your tweets. For full details, please view the instructions from Twitter.
If Twitter is the only network you want to schedule posts for then this could be a good solution. If not, you may want to try Hootsuite or Buffer.
Another popular tool to schedule tweets is TweetDeck. This is a free tool and can be a good solution if Twitter is the only network you’re interested in. This can also be useful if you have multiple Twitter accounts you need to manage.
TweetDeck is owned by Twitter. And with TweetDeck, you can easily schedule tweets without setting up a Twitter Ads account.
My Preference: Hootsuite
My favorite tool to schedule tweets is Hootsuite with the Professional plan. Any of the tools we just discussed are good tools and I’ve used them all at different times. For me, I wanted to use a tool with an auto schedule feature to try and schedule my posts at optimal times for my audience.
Both Buffer and Hootsuite have an auto schedule feature. The system in Buffer is more rigid whereas in Hootsuite the experience feels more natural. In Buffer you have pre-set times so your posts are always at those times. In Hootsuite it uses an algorithm to determine the best next time to post. Because of that the posts are staggered in a way that feels very natural.
The combination of the auto scheduling, drag and drop content calendar, multiple social networks, and unlimited scheduled posts is why I went with Hootsuite.
Schedule Now, Edit Later
All of these tools let you edit your posts. Don’t be scared to schedule ahead. If things change you can always rearrange or edit your posts later.
How Often Should I Post?
With Twitter you can post much more often than other social networks before you start to annoy people. Some people say you should try to tweet at least 14 times per day.
Instead of trying to hit a specific target I normally aim for quality over quantity. I try to post content that is meaningful and important for my audience instead of blasting articles no one needs to read.
Even though I know the data shows you get more followers when you tweet more, I’ve been on the other side of it. I know how it is to follow a company you care about and then they tweet so much junk that you can’t sift through it to find the content you actually care about.
I’d rather have a few highly engaged people than thousands of people who do nothing more than increase my follower count metric. If someone cares enough about my brand to sign up for text notifications I don’t want to annoy them. I want to be a valuable resource on whatever channel people want to follow me on.
Remember to Engage People
When you schedule out your tweets it can be tempting to set it and forget it. Scheduling does give you a lot of flexibility with the time you spend on social but don’t forget to talk to people, not just at people.
If people comment on your posts, respond. If people share your posts, like them. And it’s okay to schedule out prompts to ask your audience questions. Start a conversation. Don’t only blast them with promotional content.
Remember Your Real Life Events
When you schedule tweets you still want to come across as genuine. You want your followers to understand you’re a real person. If you have public speaking engagement or meeting or public event where some of your followers may know you’re there, don’t schedule tweets during this time.
You don’t want to have a tweet go out while you’re speaking at a conference about something unrelated. It just makes it blatantly clear that you scheduled your tweet ahead of time and didn’t put much thought into it.
Of course, if you’re tweeting from an account for your brand instead of a personal account this is not as big of an issue. Just think about your real life obligations and make sure your tweets support them and don’t conflict.
Be Sensitive of Current Events
If there is a tragedy or big news event, you may want to pause your tweets. Be aware of what’s happening in the world around you and understand that sometimes tweeting about your company may not be the right message during difficult times.
Even if the current issue isn’t directly related to your industry, you might want to take a minute to be human. Be sensitive of others by changing up your regular content to express empathy for those affected by the situation.
Summary
Scheduling your tweets can make Twitter much easier to handle. If used wisely it can also increase the effectiveness by scheduling at optimal times for your audience. Just remember to be yourself. Engage with your audience when you can.
Do you normally schedule your tweets? Do you have any tools or tips you’d recommend? Please share in the comments!
Do you want to listen to this article? Here’s the podcast episode:
Using Google Analytics for social media metrics will help you understand where you should focus your social efforts. It will help you understand which networks convert and what content has the biggest impact.
Posting engaging relevant content on social media can be time consuming. Reviewing social metrics can help you understand the social ROI. This not only can help to persuade a boss that you need to continue, but it also is a nice motivator to encourage you to keep working hard.
Social media can be time consuming. And it’s nice to know if you’re on the right path before you get too far.
There are a couple of prerequisites you should take care of before you can track social media metrics.
Prerequisites to Track Social Metrics in Google Analytics
Prereq 1: Install Google Analytics
Before you can track and review social media data in Google Analytics, you need to configure your website to use Google Analytics. You can follow my guide to setup Google Analytics.
Prereq 2: Setup Goals
It will be hard to understand if your social efforts are having a positive impact if you don’t have any goals. Make sure that you understand what your goals are for your website. Then, configure your goals in Google Analytics.
Do you need to add UTM tags?
When you post links to your website on social media, do you need to include UTM tags to be able to track the data in Google Analytics?
No, when you a user clicks on a link from a social network it will show in your Google Analytics data as a referral. The medium will be Referral. You can identify the network by viewing the Source. The source will display as the URL (for example, twitter.com or facebook.com).
But, if you use a shortlink such as bitly, then you want to add UTM tags. If you use a URL shortener, then in Google Analytics that visit will show as direct traffic. You won’t be able to identify which social network or acquisition source generated the visit.
You also want to include UTM tags for paid campaigns. This will help you dig deeper into the performance for each campaign. It also gives you a more complete picture of the total impact social plays for your website.
Any time you add UTM tags to a social network make sure to use the term social for the medium tag. This will group the data in the social report along with the organic social traffic.
Speaking of reports, let’s discuss where you can view social data in Google Analytics.
Social Media Reports in Google Analytics
There is a slew of social media reports under Acquisition > Social. We’ll walk through these various reports and the primary benefits of each.
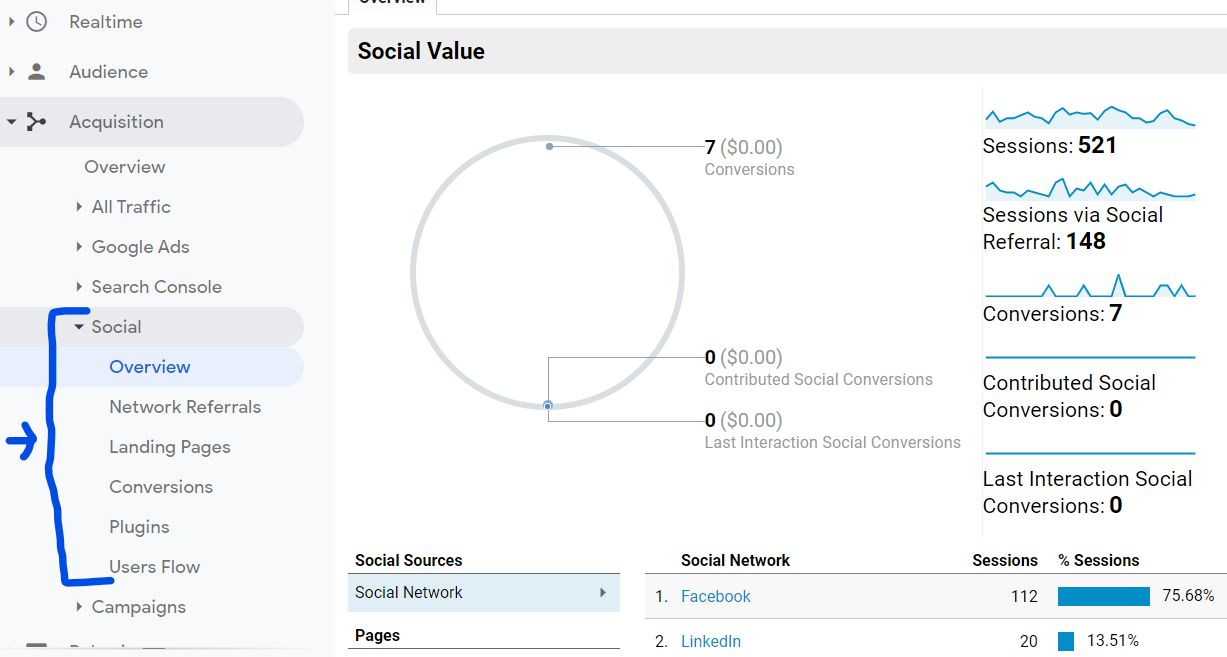
The Overview report gives you an at-a-glance recap of how social efforts contribute to the overall performance of the website.
The Network Referrals report shows you which social networks are the most popular sources your audience uses to access your website. It’s a nice report because it combines the traffic by source, regardless of the medium. So, organic Facebook traffic can be combined with paid Facebook traffic.
The Landing Pages report let’s you determine what content works best for social. Your top social landing pages may not be the same as your top Google organic search pages. Figure out what’s popular, and create similar content for future social campaigns.
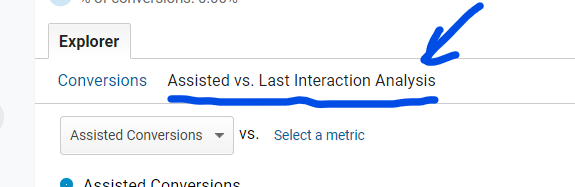
The Conversions reports let’s you figure out what social efforts are having an impact on your goals. Often, social will play a role earlier in the sales cycle. When that happens it isn’t always counted as a conversion source because it wasn’t the last source that led to the conversion. Click on Assisted vs. Last Interaction Analysis to get a better picture of the role social played in the conversion funnel.
The Plugins report shows you which social widgets on your website are utilized the most. This data is not automatically collected. You need to add events to your social plugins to track this. Google has a guide to configure social interactions.
The Users Flow report gives you a visual graph that illustrates where users went on your website when they came from various social networks. This gives you a nice idea of what type of content works best for which network.
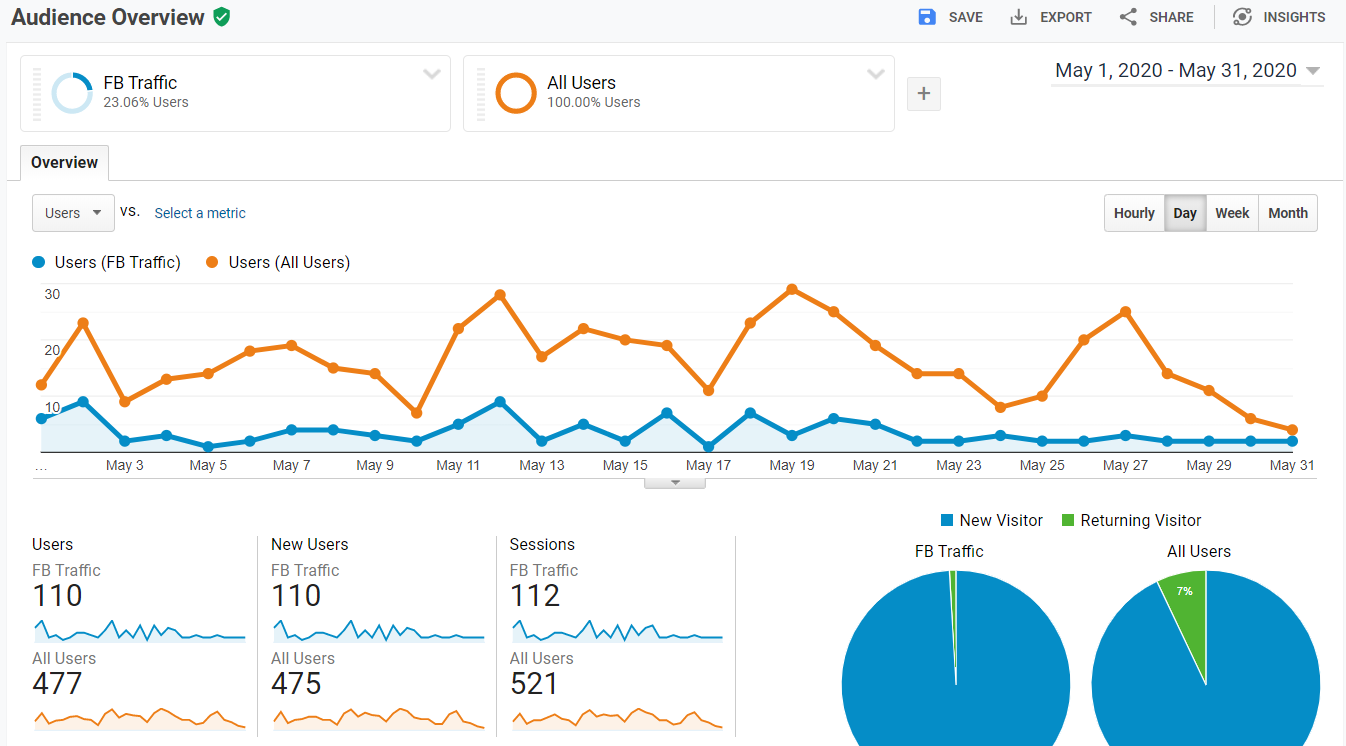
Isolate Social Traffic Using Advanced Segments
If those social reports don’t give you the data you want don’t worry, you can use any report in Google Analytics. You can create an advanced segment that targets social visitors and apply that segment to any of the other reports.
To create an advanced segment:
Click on Add Segment at the top.
Click the red New Segment button.
Under Advanced click on Conditions.
In the dimensions drop-down select Source. Then enter in the social network URLs into the type-in field.
You can click OR to add additional network URLs.
When you’ve entered the sources you want to include, add a name in the top left and click the blue Save button.
You can create multiple advanced segments and compare the data. So, you can create one for each social network you want to monitor. Or, you can create one and compare it to the default All Users segment.
Create a Social Dashboard
Once you know what social metrics you want to monitor, set up a social dashboard to make it easy to track the data.
Go to Customization > Dashboards > Create. Follow the prompts to create a new blank canvas and add the reports you want to monitor.
If you want to monitor data from Google Analytics as well as an outside source, create a dashboard in Google Data Studio instead.
Google Analytics dashboards are simple and easy to set up. They will typically get the job done. But, Google Data Studio takes it to a new level by making the reports even more beautiful and integrating with many more data sources.
What metrics do you like to monitor on your social media dashboard? Please share in the comments!
Do you want to listen to this article? Here’s the podcast episode:
When you're building a blog, one critical component is having a plan to grow your newsletter subscribers. The goal is to turn casual readers into devoted fans. Here's how to make that happen and grow your newsletter subscribers along the way.Read More
Blogging provides an incredibly empowering outlet to potentially change lives - both your own and those in your future community. Here are five reasons why you should become a blogger.Read More
ENROLLMENT NOW OPEN! Register for the free How To Do SEO Yourself online course.